EAT YOURSELF WELL

Inspiration | Information | Recipes

  • Home
  • About
  • Recipes
  • Wellness Retreats
  • Sites We Love
  • Shop
  • Inspiration

Quick Comfort Food: Grits and Greens (Plant Based!)

December 16, 2018 by Jennifer Silverberg Leave a Comment

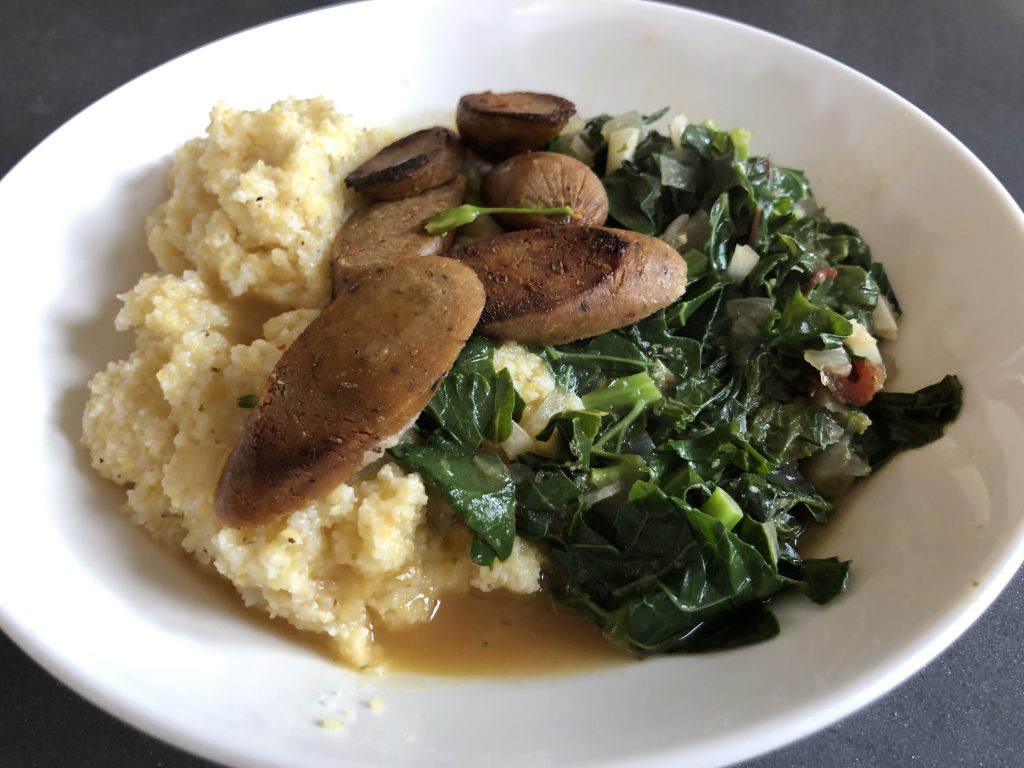
So …some (most? :-)) days, I look forward to comfort food for dinner … but don’t have the time it takes for most slow-cooked meals, and don’t want the junk that comes pre-packaged. This super-fast grits/greens recipe takes no time at all, but tastes like love, feels like something grandma used to slave over, and takes <15 minutes from idea to table!

Oh, and it’s ALL plant based – so you’re going to feel great afterwards! Feel free to play around with the recipe – use what you have on hand! No greens? Sub broccoli (or brussels sprouts or …)! Have a batch of peppers about to go bad? Add them! And so on!

Enjoy.

Quick-cook Comfort Food: Grits and Greens (Plant Based!)

Serves: 2-3
Grits:

3 cups water
¼ teaspoon salt
1 cup white corn grits or medium grind organic cornmeal
1 tablespoon vegan “butter” or olive oil
3 tablespoons nutritional yeast
Black pepper, to taste
About ¼ cup of any non-dairy milk or cheese – as you have on hand, or you like

Bring water and salt to a boil – dump in grits and stir. Reduce heat to medium low. Cook, stirring regularly, for 5-10 minutes, or until the grits are thick and creamy (cooking time will depend on the type of grits you use – course grains may take a little longer). When ready, turn off the head and stir in vegan “butter” or olive oil, nutritional yeast, non-dairy milk/cheese (if using), plus a grind of black pepper to taste.

Greens:

Splash olive oil
1 small- medium yellow onion, diced
3 cloves garlic, minced or crushed
2 cups vegetable broth (I REALLY like this one)
1 teaspoon smoked salt (I used Maldon but if you don’t have smoked, use regular)
~½ teaspoon red pepper flakes
1 lb cleaned organic greens – I love a mix of collards and kale, but either/any would do. See screen shot for reference – this is a LOT of greens
Hot sauce of your choice – I LOVE this one, it’s kind of magic: https://wildbrine.com/product/smoky-jalapeno/

Even faster: bought these already trimmed and cleaned from the farmer’s market!

Add a splash of olive oil to a large deep skillet or pot, and set to medium heat. Add onions and saute until almost tender, then add in garlic. Cook til onion and garlic are fragrant, about 2-3 minutes. Add vegetable broth, smoked salt and red pepper flakes. Now is a good time to taste the mix for balance. If it needs salt, this is a good time to add. Bring to a simmer, then add in the greens. It will seem like WAY too much, but toss the greens around a bit into the liquid and they’ll quickly start to reduce. Cook for about 5-10 minutes for tender young greens, or up to 20 minutes for more mature greens (just keep tasting little bits until it’s as tender as you like). Add a squeeze of hot sauce, or more salt, pepper, red pepper flakes if you like. If you can find Wildbrine Probiotic Sriracha, I would HIGHLY recommend it – kinda rocked my world when I made this today! But, any Sriracha would be delicious!

Optional:

This meal is delicious as-is, but if you would like some meat or something “meaty” on top, this can be topped with sausage or veggie sausage links (as shown in the pic). Just brown and slice before serving.

Plating:

In a low, wide, bowl, fill half the plate with grits, then the other half with greens. Spoon the pan liquids from the greens pan over everything, and serve and enjoy!

Good with:

Great by itself, but a vinegar-heavy side salad would be nice, too!
Filed Under: Fast Recipes, Recipes we LOVE, Superfoods, Winter Recipes Tagged With: comfort food, dinner, greens, grits, winter

Savory Sweet Butternut Squash Soup

February 4, 2018 by Jennifer Silverberg Leave a Comment

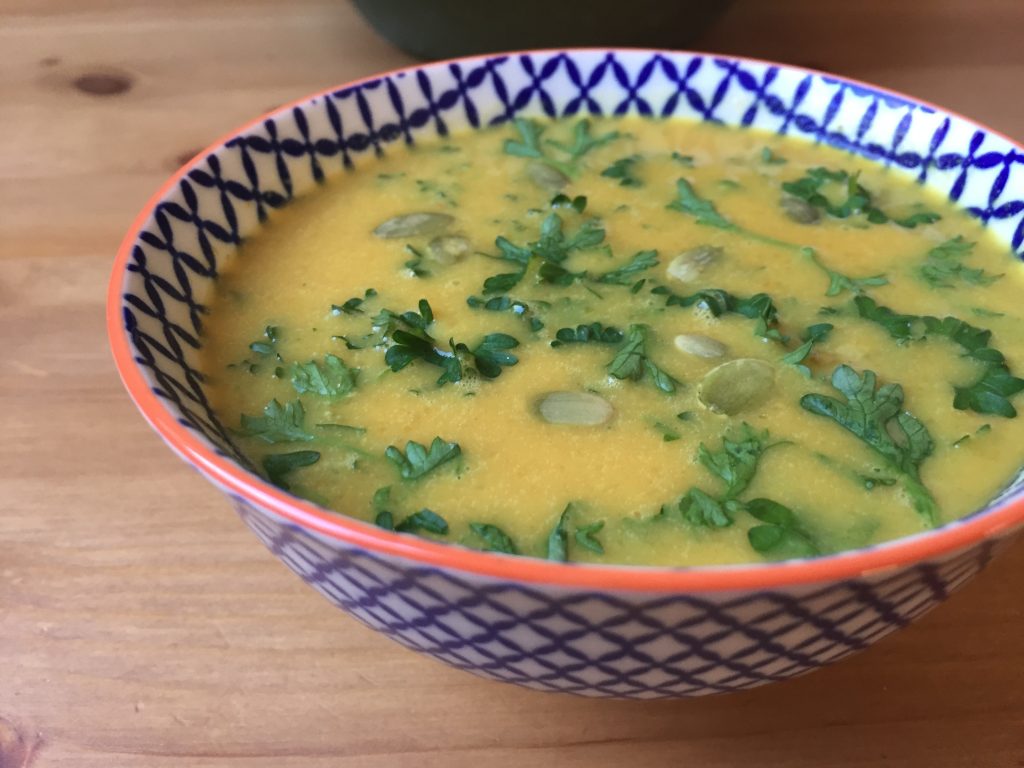
When it’s cold and wet outside (like today), I want comfort food with a kick … and this Butternut Squash soup, with its sweet and spicy flavor profile is really perfect. A light salad with a tarragon vinegar and oil dressing makes a perfect companion, clearing your palate and letting you rediscover the creamy warmth again and again.

And fair warning – it’s a “little” addictive … so it’s good that it’s super-simple to make.

Butternut Squash Soup - Eat Yourself Well

All the best flavors – sweet and spicy – in a creamy, delicious, healthy soup!


The Amazing Savory Sweet Butternut Squash Soup

-1 tbsp. coconut oil (Click here to cart my favorite!)
-2 shallots
-2 cloves garlic
-1 butternut squash, peeled and cut into chunks (5-6 c.)
-1 1/2 tbsp curry powder
-1/2 tsp. cinnamon
-salt and pepper
-1 can (14 oz) coconut milk
-2 c. vegetable broth
-2 tbsp maple syrup
-1 tsp. sriracha (or dry chili spice)


Click above to add these ingredients to your Walmart cart, or click here to choose other stores!

Choose your Favorite Retailer to Cart the Ingredients


1. Heat the oil over medium heat; once warm add the shallots and garlic (finely chopped) and sauté until light brown.
2. Add the squash and spices, stirring frequently over the next four minutes.
3. Cover and simmer over low heat (until squash is tender).
4. Blend with immersion blender, add more spices as needed over the next few minutes of simmering (just for a few minutes after blending it all together), then serve with desired garnishes. Pictured here with parsley and pepitas (crunchy texture is awesome to offset the creaminess!). Also very tasty with a bit of candied nuts.

Filed Under: Fast Recipes, Gluten-Free, Healthy Lunch Ideas, Recipes we LOVE, Seasonal Eating, Superfoods, Winter Recipes Tagged With: butternut squash, lunch, soup

Seriously Craveable Cauliflower (yes … cauliflower!)

June 10, 2017 by Jennifer Silverberg 3 Comments

I know, it’s not even cauliflower season right now (they’re available year-round, but best in the fall), but I had a head in the fridge and was looking for an early (and easy and healthy) lunch.

I decided to give it a very simple prep, but one last new addition turned a delicious simple lunch into a culinary experience! Cauliflower recipe below.

Seriously Craveable Cauliflower
1 head Cauliflower
2 Bay leaves
Couple of tablespoons (approx) Herbes de Provence
Salt to taste
Pepper to taste
Red pepper to taste
1 tsp high quality olive oil (approx)
1 tbsp regular or vegan mayonnaise (I love Just Mayo – click here to add it to your cart, but whatever you like best will do)

Wash cauliflower head, removing leaves but keeping the stem and florets intact. Put in a saucepan big enough to fit the full head with the top on, and add about an inch of water. Float both bay leaves in the water, and sprinkle the Herbes de Provence over the cauliflower and into the water. Add the olive oil and a pinch of salt to the water.

Turn on the stove to medium-high until the water boils, then cover and turn down the heat to medium. Cook about 20 minutes, or until the cauliflower is easily cut with a knife. Lift the cauliflower out with a spatula or two, keeping it intact if possible. Put in a low bowl and add red and black pepper, and salt if you like, to taste. Then, remove the bay leaves from the remaining liquid in the pan, stir to add the spoonful of mayonnaise, then pour over the cauliflower.

Enjoy immediately. This is beautiful served as a complete head, but if it breaks or if you’d just prefer, you can break the florets apart and it is still lovely and oh, so delicious!

Serves one as a full meal, two as a side.

Filed Under: Recipes we LOVE, Superfoods Tagged With: cauliflower, healthy cauliflower

Magnificent Mushrooms: 4 to Know

February 28, 2015 by Jennifer Silverberg Leave a Comment

A little secret: I used to think I disliked mushrooms … but the only ones I’d had were those crazy little white button mushrooms that come pre-washed and wrapped in plastic, for who knows how long. A few years ago, the local mushroom growers at my farmer’s market opened my eyes and now I’m positively addicted, and super-thankful for it!

You know I love things super-simple, so it’s probably no surprise that my favorite way to cook them is an easy sear of trimmed (but not chopped) mushrooms in a single layer in a cast iron pan with olive oil and a pinch of salt. Sometimes my family and I stand over the pan and eat them hot and crispy, before they ever make it to the table. Occasionally I get fancy and add shallots and a bit of white wine at the end, but really, there is nothing like hot and crispy mushroom bits fresh out of the pan.

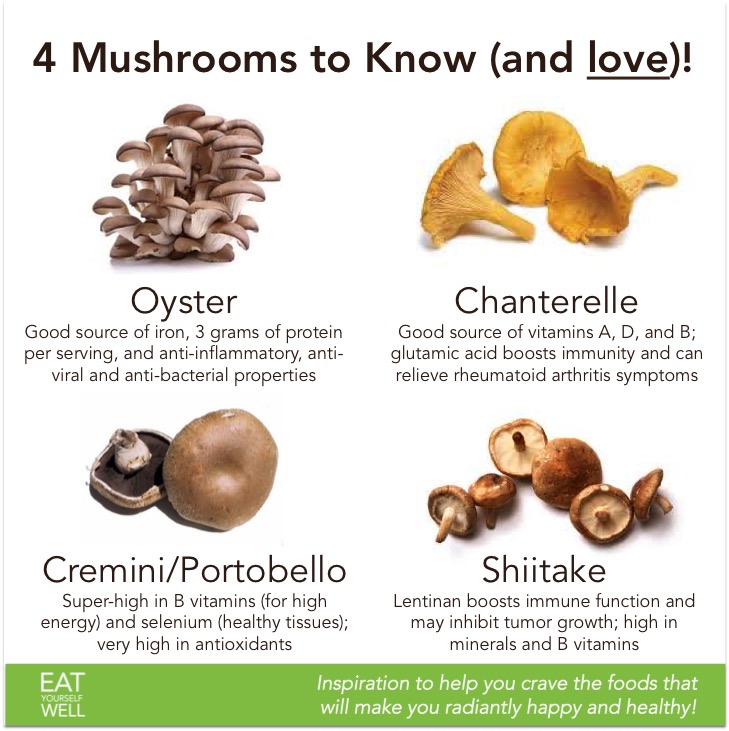
And the best part? Inside all this deliciousness lives all of these benefits!
4 Mushrooms to Know - Jennifer SIlverberg

Filed Under: Nutrition News and Ideas, Recipes we LOVE, Superfoods Tagged With: healthy mushrooms, mushrooms, types of mushrooms

Cashew Cream Sweet Potato Mash

February 26, 2015 by Jennifer Silverberg 3 Comments

File this under “necessity is the mother of invention!” We don’t get much snow where I am, but we got a dusting yesterday. So, the roads closed right about the time I got to the bottom of my veggie crisper – oh, no!!

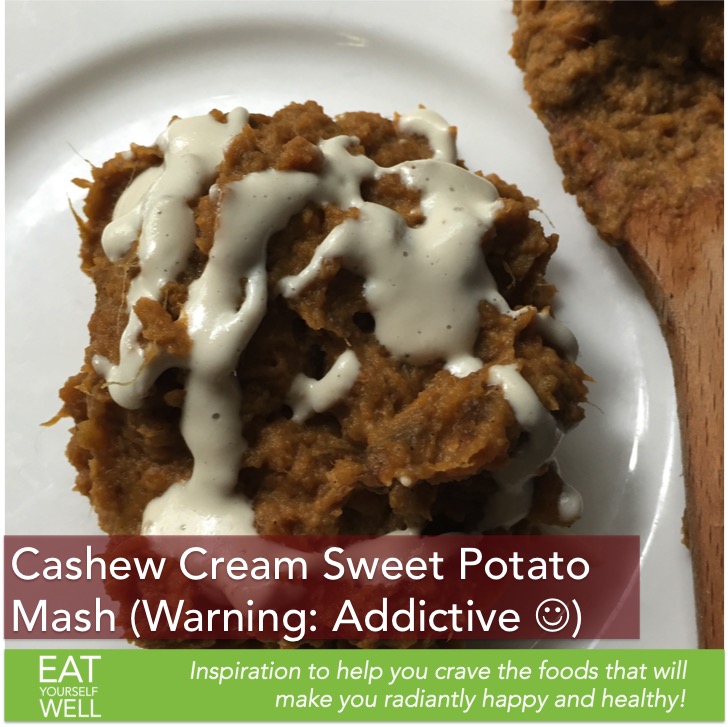
Lunch today meant getting a little creative with the giant (SERIOUSLY giant) sweet potato I had on the counter, and some cashews from the fridge. And it turned out AMAZING. Give this a try, even if it’s not the last food you have left in the house!
Cashew Cream Sweet Potato Mash

Ingredients

Potatoes
– 2 large sweet potatoes (or one freakishly large one – I think I had a 2-pounder!), sliced into 1-2″ chunks
– 1 tbsp coconut oil (or olive oil if you don’t have coconut)
– 1/2 cup water
– 1 tsp cinnamon
– 1/2 tsp cumin
– sprinkle of salt

Cashew Cream
– 1 cup fresh, unsalted cashews
– water
– 1 tbsp maple syrup
– 1 tsp vanilla
– 1/4 cup Dried coconut flakes, unsweetened (can be omitted)

Heat the oil in a large pan, add the sweet potatoes, sprinkle with the spices, stir, and brown for about 5 minutes. Add the water, stir, cover, and cook for about 20 minutes or until the sweet potatoes are soft.

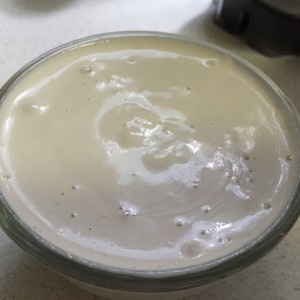
IMG_1321In the meantime, in a high-speed blender (like Vitamix), add the cashews, maple syrup, vanilla, and coconut flakes, add water to come to just the top of the cashews, and blend until super-smooth and creamy, with no trace of the nuts.

When the potatoes are ready, put them in a bowl, and mash them with the cashew cream to taste. Top with a little more, just for fun.
IMG_1329
NOTE: You will have leftover cashew cream, which is AWESOME. Use it as an amazing fruit topping, in smoothies, over any baked goods (bread, whatever), eat it straight from your bowl as a treat, or just make more sweet potatoes tomorrow!

Filed Under: Recipes we LOVE, Superfoods, Winter Recipes Tagged With: Jennifer silverberg, simple, sweet potatoes

Bold Winter Greens Salad

December 6, 2014 by Jennifer Silverberg Leave a Comment

Bold Winter Greens Salad

Bold Winter Greens Salad

This bold winter salad pairs well with hearty but simple winter soups like white bean, or veggie chilis. I usually find myself going back for second and third helpings – and it actually holds well in the fridge as well – so I make a LOT of this salad at a time.

Dressing:
1/3 C tablespoons olive oil
1/4 C tablespoons white balsamic vinegar
1 tablespoon raw honey (or regular if raw is not available)
1 tablespoon oregano, dried
1 teaspoon Dijon mustard
1 clove garlic, minced
1/2 teaspoon salt
1/4 teaspoon freshly ground black peppercorns

Vegetables/Fruits:
4 – 6 collard leaves, trimmed and finely chopped
1 bunch kale, with stems removed, then rolled (like a cigar) and thinly sliced into ribbons
1 head romaine lettuce, diced
1/4 small head red cabbage, diced
Optional: other winter greens, like escarole, chicory, or endive, sliced
1 apple, cored and thinly sliced – no need to peel
1/2 yellow onion, finely diced
1/2 orange bell pepper, diced
1 avocado – peeled, pitted, and diced
1 large carrot, sliced horizontally using vegetable peeler
Optional: walnuts, crushed

Directions

Mix all dressing ingredients in a mason jar or similar, shake well, and sit aside to let flavors blend. Salt can be reduced a bit if needed, but not eliminated entirely, or the ingredients will not mix properly.

Chop all vegetables per ingredient instructions. This salad is MUCH better if the thicker greens, like collard and kale, are properly prepared by being thinly sliced!

Place all veggies in a large bowl, and toss with about half of the dressing. Let sit for at least 15 minutes, and then serve with remaining dressing added to taste. Top with walnuts, if desired.

Filed Under: Healthy Lifestyle, Recipes we LOVE, Superfoods, Winter Recipes

Easy Pumpkin Fig Mousse

November 1, 2014 by Jennifer Silverberg Leave a Comment

This is SUCH a simple recipe, and a healthy way to celebrate the pumpkin flavors of the season. You’ll get more compliments than you feel you deserve … what a great way to start the holiday season, right?

Pumpkin Fig Mousse

Easy Pumpkin Fig Mousse Recipe

Note: As with all recipes using Real Food ingredients, all measures are approximate, and the right blend depends on the characteristics of your in-season veggies (they can vary significantly in sweetness, spiciness, texture, etc.). You’re safe to experiment!

Ingredients

  • One 16 oz can (BPA-free) or box of organic pumpkin – not pumpkin pie mix! (Feel free to sub with one sugar pumpkin, roasted, if you’re feeling like roasting pumpkin!)
  • Two dried figs
  • 1 tbsp pumpkin pie spice or garam masala (like pumpkin pie spice, but a little more exotic) If you really like cinnamon or ginger or vanilla or whatever, feel free to add a bit more of this.
  • Optional garnishes if you’re feeing fancy: salted pumpkin seeds (highly recommended for the contrast to the sweet pumpkin), sliced fresh fig, dab of greek yogurt, coconut cream, or fresh whipped cream, and/or organic graham cracker squares (which can give the sense of a “crust”)
  • Toss all ingredients in a strong blender, like a Vitamix, and blend until smooth. Taste, and adjust spices to your liking. Add another fig or a spoonful of maple syrup if you want it sweeter. If you’ve added anything, re-blend, then pour into serving dishes. Hold until ready to serve, add garnishes, and be ready to accept compliments!

    Filed Under: Superfoods Tagged With: easy pumpkin pie, healthy pumpkin dessert, healthy pumpkin pie, pumpkin mousse

    The Most Delicious Anti-Inflammatory Herbs and Spices

    October 14, 2014 by Jennifer Silverberg 1 Comment

    Anti-inflammatory Herbs and Spices

    Inflammation is healthy when it’s a response to a specific threat – it’s the body’s healing response to injuries and some illnesses. But our modern diets and lifestyles introduce persistent stressors, including emotional stress, environmental toxins, and foodborne chemicals, that can keep our bodies chronically inflamed.

    Chronic inflammation is increasingly being implicated in studies as the root cause of many serious illnesses – including heart disease, many cancers, memory diseases like Alzheimers, and autoimmune diseases … as well as being seriously taxing on our energy levels and mood.

    A diet rich in fresh, unprocessed fruits and vegetables, especially when combined with anti-inflammatory herbs and spices like the ones shown above, can help heal your body, and help it preserve your inflammation response for those times when it is needed to fight specific, acute, stressors like injuries.

    And – it’s a delicious way to eat … notice that you have all the spices for a pumpkin pie in this chart! Need a recipe? Try this one: Pumpkin Pie Baked in the Pumpkin.

    Filed Under: Cooking Tips, Healthy Lifestyle, Stealth Health, Superfoods Tagged With: anti-inflammatory, anti-inflammatory spices, healthy herbs, healthy spices

    Healthy Pumpkin Pie, Baked in the Shell

    October 13, 2014 by Jennifer Silverberg 2 Comments

    Pumpkin Pie Baked in the Pumpkin

    Fresh Pumpkin Pie SliceOk, now THIS was a fun one to figure out! I wanted a fully REAL food pumpkin pie – nothing processed. And I wanted to bake it in the shell. And I wanted it to be fairly easy. Here you go: simple, healthy, and beautiful!

    If you’re thinking of making this for Thanksgiving, you may want to make it once or twice ahead of time, too. Not because it’s tricky or anything, just because it’s delicious :-).

    Ingredients
    2 medium “Sugar Pumpkins” – these are NOT jack o’lantern pumpkins, they’re quite different. Look for ones marked “sugar pumpkins” or “baking pumpkins.”
    1/2 cup maple syrup
    3-4 tbsp “pumpkin pie spice” (or mix of cinnamon, nutmeg, ginger, cloves and allspice)
    1 tsp salt
    1.5 cup raw cashews
    1 tablespoon vanilla
    I also like to add some freshly ground nutmeg and a little fresh ginger if I have it on hand
    Pepitas for garnish
    Optional: 1/4 cup marscapone cheese – makes the pie super-creamy, but omit for vegan version
    Optional: 2 eggs – they’re not needed, but some people prefer the texture of eggy pumpkin pie

    How to make

    Preheat oven to 350.

    Cut the tops off of both pumpkins, and cut one in to halves, leaving the other whole. With a spoon, scrape out the seeds and other tissues and put aside (you can roast the seeds later if you like).

    Pumpkin pieces ready to roastMix the maple syrup, spices, and salt, and pour into the “bowls” of the halves and the whole pumpkin, and spread around the inside surface. Place these on a large baking sheet and lay a piece of aluminum foil over all. Place into the oven – they are going to cook about 30 – 50 minutes (totally depends on the pumpkins, they can vary considerably), until softened but the shell of the large pumpkin is still solid (not collapsed).

    Remove the pumpkins to cool. Put the cashews, a little water and vanilla in a high speed blender (like Vitamix) or food processor. Note: If you do not have a high speed blender, simmer the cashews in water for about 15 minutes, then discard the water before processing) Process until smooth, adding a little water as needed to make smooth. If you are using marscapone cheese and/or eggs, add them now.

    When the pumpkin pieces are cool enough, pick them up and pour the remaining maple syrup/spices from them directly into the cashew mix and continue blending on low. Then, scrape the soft pumpkin pulp from the pumpkin halves, all the way to the skin (discarding skin), and add to the blender (still on low). Last, scrape about half of the pumpkin pulp from the whole pumpkin, leaving enough to preserve the structure, and also add this to the blender. Process until smooth. Note: you may overflow your blender, and have to blend in stages.

    Taste the pumpkin mixture (assuming you haven’t added eggs) and adjust seasonings – I usually wind up adding some more spices at this point.

    Pumpkin ready to go back into the oven

    Pumpkin ready to go back into the oven. Note that the filling will expand a bit, so expect it to overflow if you fill to the edge.

    When the filling is ready, slowly pour it back into the whole pumpkin, and put the “pie” back in the oven to bake for another 40 – 50 minutes or so, until the top is browned and the filling seems to be set. Remove, and let cool to room temperature, or place in the refrigerator to serve later (most people prefer pumpkin pie to be chilled).

    I like to serve this topped with a little more cashew cream or marscapone, blended with a bit of maple syrup, plus a sprinkling of toasted pumpkin seeds. Slice from top to bottom and put slices flat onto plates, then top with the cashew cream or marscapone. Beautiful and delicious – Enjoy!!!

    Filed Under: Holiday Cooking, Recipes we LOVE, Seasonal Eating, Superfoods, Winter Recipes Tagged With: healthy pumpkin pie, pumpkin pie baked in the shell, pumpkin pie from scratch, vegan pumpkin pie, vegan thanksgiving

    Turmeric Green Tea – Antioxidant Blast!

    September 15, 2014 by Jennifer Silverberg 1 Comment

    Turmeric Green Tea

    This super-simple green tea adds a blast of flavor and healthy antioxidants with a shake of ground turmeric … delicious and oh-so-healthy!

    Preferably, use a tea strainer (like this) with loose green tea – the tea is less expensive this way, and causes less waste. If you don’t have one, it can be made with tea bags also.

    Simple Instructions (makes two cups);

    Add green tea and about 1 tsp (more if you like) powdered turmeric to a tea strainer. Bring water to a boil, take off the heat and wait a minute or two to let it cool just a bit. Put the tea strainer in the first cup and pour water over all. Let the tea brew in the cup for about 2-3 minutes. Then remove the strainer and move to the second cup to repeat the brew, adding about a half of a tsp of turmeric to make up for the parts that strained into the first cup. Again, brew for about 2-3 minutes.

    On the choice of green tea: any type will be good, but recent tests among common brands have shown Teavana Gyokuro Imperial Loose-Leaf Green Tea to have the highest levels of EGCG (the antioxidant in green tea believed to be most responsible for its health benefits).

    Filed Under: Juices and Smoothies, Superfoods, Winter Recipes Tagged With: antioxidant tea, green tea

    • 1
    • 2
    • 3
    • Next Page »

    Are you ready to…

    Lets get social


    Want more? Follow us on social media.

    Take a look around

    Favorite Posts

    Recent Posts

    • COVID Has Reminded Us: Health REALLY Matters
    • Amazing and Easy Banana Bread
    • Healthy Resolution!
    • Happy Healthy Christmas Salad!
    • Quick Comfort Food: Grits and Greens (Plant Based!)

    Popular Posts

    101 Fast/Healthy/Fabulous Snack Ideas

    Copyright © 2023 · Foodie Child Theme by Shay Bocks · Built on the Genesis Framework · Powered by WordPress